Thursday, May 3, 2012

Vecco Rugs


I am so excited to share with you an awesome new project I found, Vecco Rugs! It's AWESOME. You pick what size rug you want and stencil, order the kit {which includes everything you need; rug, paint, stencil, and sealant} and make your very own personalized rug. It's that Easy! There are tons to choose from...go check it out and get one!

Get 50% off a kit TODAY ONLY using the code: RUG50

So go now and get your own!


Wednesday, May 2, 2012

The BEST YoU


It has been become very clear to me lately that the Lord is telling me to slow down, stop looking around at what everyone else is doing and focus on where I am at this point in my life. We are all at different points in our lives and facing different trials. When I focus on Him, I can be a better me. That's really all He wants...me to be a better me and you to be a better YOU! God gave us all gifts and they are all very different, take what He gave you and be the best you!

Friday, December 9, 2011

Great Holiday Appetizer


This is my family's ALL time favorite appetizer & I'm sure you will love them too!
A friend of mine made these a few years ago when I was visiting and that was it I was in love! They are SO yummy and very easy to make so it's a win win!!
Here is what you need:
triscut crackers
tomatoes sliced {I get the size bigger than cherry tomatoes that are still on the vine}
fresh mozzarella {I use the small balls}
pesto

Just layer in that order and bake on a foil lined cookie sheet at 350 until the cheese is melted. It wont take long so keep your eye on them!

These need to be enjoyed right out of the oven while everything is still hot and gooey. This makes a great Christmas appetizer since it's Red & Green

Merry Christmas!


Thursday, December 8, 2011

time for a little something sweet

Well hello there again! Its Sam from last week and I'm back to share a yummy, sweet treat of mine - toffee!! I LOVE to bake (almost) anything and obtained this super simple recipe a few years ago.  I now make it every holiday season and its a huge hit!

WARNING : this is highly addictive stuff

Ingredients/supplies:
16x12x1 pan (also called a jelly roll pan)
aluminum foil
3/4 cup light brown sugar
3 sticks of butter (I said it was yummy, not healthy)
graham crackers
24 oz. semi sweet chocolate chips


 Directions:
Line your pan with foil and heat oven to 350


Cover the bottom of the pan with graham crackers (took about 1 1/2 pkgs) 


Melt butter and brown sugar and bring to boil while stirring, let boil for 3 to 4 minutes as you stir (don't stop stirring or you may burn it - that's not good)


Pour butter/sugar mixture over graham crackers and smooth out evenly with back of spoon


Bake at 350 for 10 minutes (it will be bubbly)


Remove from oven and immediately pour chocolate on top


Again with your spoon, spread the chocolate evenly (it will melt quickly)


Once chocolate is all melted, refridgerate at least 3 hours or overnight (this is best)


When you are ready to eat (or share it with those you love), FIRST remove the foil from the back of the toffee, THIS IS VERY IMPORTANT, THEN break the toffee into small pieces. If you break the toffee before removing the foil, you will either eat the foil or spend the day removing the tiny bits of foil from your toffee treat, PLEASE remove the foil first!!! (Don't learn this lesson the hard way)

Keep refridgerated until ready to serve and refridgerate leftovers (if any)!!

Enjoy your toffee with some warm cider, hot cocoa or sneak a piece in the middle of the night (its addicting, remember?)

happy baking!
-Sam

Thursday, December 1, 2011

its beginning to look a lot like Christmas...

hi there. I'm Sam, Ashleys friend, your guest blogger this week.  I'm mom to 2 sweet girls, E & M. We love to bake, play dress up and dance in the kitchen - what can I say, we're girly!


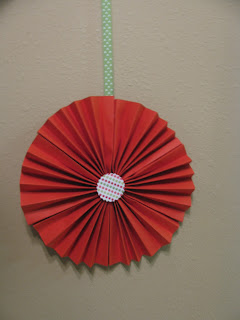
Now that its December, we have decorated our house with holiday cheer and this year added a new favorite item: paper rosettes!

pretty, right???

I learned how to make these a few months ago and have made them for all kinds of celebrations ever since! A baby shower, halloween, a going away party and now Christmas - what can I say, I like them. They are super easy to make too, bonus! How about a little tutorial?

you'll need to gather a few things:
3 sheets of paper for each rosette (I used 12x12 scrapbook sized)
paper to punch out for decorative center
2" hole punch
ribbon
hot glue gun and/or stapler
(all of these items can be found at your local craft store)


you'll need to start by folding each sheet of paper like an accordion, until you have this:


and punching or cutting a 2inch circle of coordinating paper for each rosette
(I prefer the scalloped edge)


next, fold each accordion in half


then, staple/glue the ends of your pleated paper it to itself on what will be the back side (hope this makes sense) [if your paper gets a bit wrinkled, no worries - just fold along the creases again]
before you flip it over - glue your ribbon to one little spot so you can hang it


last, flip it over, glue your punched out paper to the front


and voila, a perfectly made rosette for your holiday decorating!!


you can also make these for Halloween:


or a baby shower:


They are fun and easy! Hope you are soon headed to your local craft store to get fun papers for your next event or holiday and make these, they will earn you points in the 'wow' factor department! Happy crafting!

-Hugs,
Sam 

Monday, November 28, 2011

Now a Family of Five


We are proud to announce the birth of our third child
Wyatt Benjamin Hatley
Born November 14th, 2011

We are over joyed! As I am getting into the swing of things with three little ones, homeschooling and potty training I do have many crafts up my sleeve soon to be coming your way! I will also be having some guest post by some of my crafty friends...so please keep stopping by!

Follow me!

Thursday, November 17, 2011

Baby Shower gift


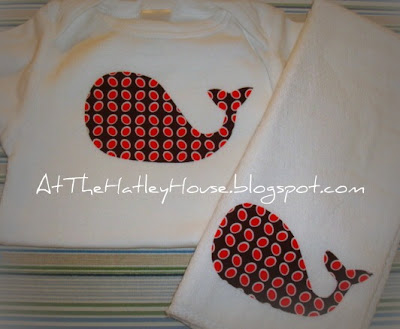
Over the weekend my girlfriend had a baby shower and this is what I gave her! A mathcing onesie and burp clothe. In an earlier post HERE I showed how to make these adorable onesies. I did the same thing for the matching burp clothe. Cute huh? Really simple & really cute, two of my favorite things!!