Friday, December 9, 2011

Great Holiday Appetizer


This is my family's ALL time favorite appetizer & I'm sure you will love them too!
A friend of mine made these a few years ago when I was visiting and that was it I was in love! They are SO yummy and very easy to make so it's a win win!!
Here is what you need:
triscut crackers
tomatoes sliced {I get the size bigger than cherry tomatoes that are still on the vine}
fresh mozzarella {I use the small balls}
pesto

Just layer in that order and bake on a foil lined cookie sheet at 350 until the cheese is melted. It wont take long so keep your eye on them!

These need to be enjoyed right out of the oven while everything is still hot and gooey. This makes a great Christmas appetizer since it's Red & Green

Merry Christmas!


Thursday, December 8, 2011

time for a little something sweet

Well hello there again! Its Sam from last week and I'm back to share a yummy, sweet treat of mine - toffee!! I LOVE to bake (almost) anything and obtained this super simple recipe a few years ago.  I now make it every holiday season and its a huge hit!

WARNING : this is highly addictive stuff

Ingredients/supplies:
16x12x1 pan (also called a jelly roll pan)
aluminum foil
3/4 cup light brown sugar
3 sticks of butter (I said it was yummy, not healthy)
graham crackers
24 oz. semi sweet chocolate chips


 Directions:
Line your pan with foil and heat oven to 350


Cover the bottom of the pan with graham crackers (took about 1 1/2 pkgs) 


Melt butter and brown sugar and bring to boil while stirring, let boil for 3 to 4 minutes as you stir (don't stop stirring or you may burn it - that's not good)


Pour butter/sugar mixture over graham crackers and smooth out evenly with back of spoon


Bake at 350 for 10 minutes (it will be bubbly)


Remove from oven and immediately pour chocolate on top


Again with your spoon, spread the chocolate evenly (it will melt quickly)


Once chocolate is all melted, refridgerate at least 3 hours or overnight (this is best)


When you are ready to eat (or share it with those you love), FIRST remove the foil from the back of the toffee, THIS IS VERY IMPORTANT, THEN break the toffee into small pieces. If you break the toffee before removing the foil, you will either eat the foil or spend the day removing the tiny bits of foil from your toffee treat, PLEASE remove the foil first!!! (Don't learn this lesson the hard way)

Keep refridgerated until ready to serve and refridgerate leftovers (if any)!!

Enjoy your toffee with some warm cider, hot cocoa or sneak a piece in the middle of the night (its addicting, remember?)

happy baking!
-Sam

Thursday, December 1, 2011

its beginning to look a lot like Christmas...

hi there. I'm Sam, Ashleys friend, your guest blogger this week.  I'm mom to 2 sweet girls, E & M. We love to bake, play dress up and dance in the kitchen - what can I say, we're girly!


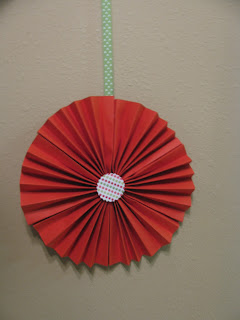
Now that its December, we have decorated our house with holiday cheer and this year added a new favorite item: paper rosettes!

pretty, right???

I learned how to make these a few months ago and have made them for all kinds of celebrations ever since! A baby shower, halloween, a going away party and now Christmas - what can I say, I like them. They are super easy to make too, bonus! How about a little tutorial?

you'll need to gather a few things:
3 sheets of paper for each rosette (I used 12x12 scrapbook sized)
paper to punch out for decorative center
2" hole punch
ribbon
hot glue gun and/or stapler
(all of these items can be found at your local craft store)


you'll need to start by folding each sheet of paper like an accordion, until you have this:


and punching or cutting a 2inch circle of coordinating paper for each rosette
(I prefer the scalloped edge)


next, fold each accordion in half


then, staple/glue the ends of your pleated paper it to itself on what will be the back side (hope this makes sense) [if your paper gets a bit wrinkled, no worries - just fold along the creases again]
before you flip it over - glue your ribbon to one little spot so you can hang it


last, flip it over, glue your punched out paper to the front


and voila, a perfectly made rosette for your holiday decorating!!


you can also make these for Halloween:


or a baby shower:


They are fun and easy! Hope you are soon headed to your local craft store to get fun papers for your next event or holiday and make these, they will earn you points in the 'wow' factor department! Happy crafting!

-Hugs,
Sam 

Monday, November 28, 2011

Now a Family of Five


We are proud to announce the birth of our third child
Wyatt Benjamin Hatley
Born November 14th, 2011

We are over joyed! As I am getting into the swing of things with three little ones, homeschooling and potty training I do have many crafts up my sleeve soon to be coming your way! I will also be having some guest post by some of my crafty friends...so please keep stopping by!

Follow me!

Thursday, November 17, 2011

Baby Shower gift


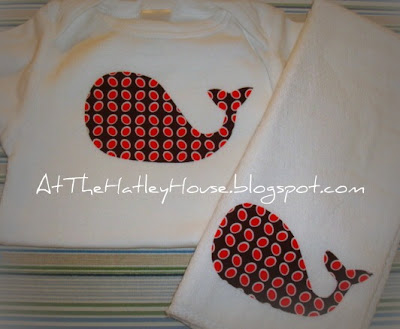
Over the weekend my girlfriend had a baby shower and this is what I gave her! A mathcing onesie and burp clothe. In an earlier post HERE I showed how to make these adorable onesies. I did the same thing for the matching burp clothe. Cute huh? Really simple & really cute, two of my favorite things!!


Monday, November 14, 2011

Hot Chocolate Recipe


*The BEST hot chocolate Recipe*
This is my husband great aunt's hot cocoa recipe...and I'm sharing it with YOU! Be very excited!
{warning: this makes TONS so share!}

1 box (1lb) carnation instant nonfat dry milk
2 lb nestle nesquick chocolate
1 lb box of powdered sugar
1 lb nestle coffeemate original

1/4 c + 1 c hot water = the BEST hot chocolate ever!
seriously!

Mix it all together with some lovin' and put it in fancy jars and give it away! This makes great gifts for neighbors and friends!

Saturday, November 12, 2011

Cute clothes pins


Everything should be pretty in my opinion. Why not your clothes pins? We use a lot of clothes pins around the Hatley house for all kinds of things. I got tired of looking at boring wooden clothes pins and decided to make em' fancy! My little girl even helped with this and had a great time doing so!

Here is what you need:

scrapbook paper
mod podge
clothes pins
sponge paint brush
scissors
pencil


Trace each side of your clothes pin with your pencil onto the scrapbook paper. Cut them out and use your mod podge to glue them onto the clothes pin. Let them dry and now your clothes pins are fancy too!


Even your clothes pins should be fancy!

Thursday, November 10, 2011

Redneck Wine Glass


Redneck Wine glass

adorable huh?
 I have been making these and giving them to my girlfriends along with a bottle of wine!
Super easy to make....lemme tell ya how!

Regular mason jar
candle stick {mine are from the dollar tree}
and glue {make sure it's craft glue for glass that is dishwasher safe}
sand paper


Sand paper the top of the candle stick and the bottom of the jar. Apply the glue around the top of the candle stick and stick it to your jar. [ I always turn my jar upside down so I can press the candle stick down on the jar ] Let it sit and dry
 TADA that's it!
You can make this fancy if you like depending on the person you are giving it to. Make it your own, be creative!

Go make some, they are great gifts!


*Happy Crafting*

Thursday, October 6, 2011

Balloon Wreath

Have you seen these around?
I have seen them at a few craft shows lately. Thought it was pretty cute so I made one for Ella's birthday party. Very easy!
Here is what ya need:
straw wreath
balloons [lots]
stapler or tacks

{Here is what it looked like when I was 3/4 of the way done}
Just staple each balloon in the middle of the balloon so it folds in half. Cover the front and sides of the wreath so that when you look at it from the front you don't see the straw.
Easy Huh?
Pretty cheap and easy. Great for any party or baby showers! Ella's birthday was rainbow themed so I used every color but these wreaths would be very cute with specific colors like blue, green & orange (for a baby boy shower) You get the idea....


Try it!


Here was her cake:

It was a whole family effort!
Everyone was very excited about this cake so they all helped, Ella did the icing, Mason tried to eat it every chance he could while we were putting it together & Daddy added the layers! This is the first year I have done a home made cake for a birthday [usually I go CRAZY and all out for birthdays] This was a lot of fun though. I think we will be making birthday cakes at home from now on!


Here is my big 5 year old a few days after her birthday on her way to her very first slumber party! My goodness they grow up fast. She is so Cute!!! I am in love with that sweet 5 year old!

Wednesday, October 5, 2011

Tea dyed onesies

Wyatt will be here soon!
I am busy getting things ready for his arrival. I pulled out some of Mason's newborn onesies that were a little stained and dyed them with Tea! Good old Tea! Then I added some vintage buttons to this one. I dyed a couple and added some grey elephants! [cause I'm still in love with grey elephants] 


Cute huh?
I think so too!!!

Here is a tutorial from Simple Simon & co {A blog that I love love love, these ladies are super duper talented} You should check em out & follow them! Follow me while your at it...PUH-LEASE!


Have a GREAT day!
Go dye something with TEA!

Tuesday, September 27, 2011

New life to Old onesies


Wyatt is going to be our third child so there are some hand me downs in his future for sure! To make them feel New I added some cute fake appilque animals!
I bought a wonderful thing at Jo-Anns called Heat N Bond {about $3 a pack} Follow the directions on the package and Ta DA!

I cut all my animals out by hand [which is to why they are all different HAH!] It would be great to have a stencil or one of those fancy machines that cut stuff out for you. But if you are like me and don't have any fancy cutters or stencils Free hand it!

Then I doubled up my thread and hand stitched fat stitches to create the look I wanted

See:


This makes a great personalized baby shower gift, although I would reccomend buying new onesies. You could even make a matching burp cloth. Now that's a great idea... Matching onesie & burp cloth!
I am in love with gray elephants right now!
Now Wyatt has "new" onesies that are adorable and just for him!

Thursday, September 8, 2011

Lamp shade REcovered

Lamp Shade REcovered
Isn't this AWESOME?
I think so too! I have been wanting to do this for a while now but never got around to. I FINALLY did yesterday. Here it is!
I used a lamp shade that was already on this lamp, a glue gun, felt fabric {gray & white}, and an iron

I got the idea from VintageRevivals.blogspot.com {One of my FAV blogs EVER}
HERE she gives a tutorial

Enjoy!

It's in my kitchen, we live in an old old house and there isn't much lighting so we improvised with this little lamp to add some light. This new shade makes it look so cute! I love walking into the kitchen and seeing it!

Saturday, September 3, 2011

Yarn Wreath with Felt Flowers

I L-O-V-E this wreath and am sad to say this picture doesn't do it justice at all.
I wrapped it in yarn and added two felt flowers, with super cute buttons!

For the wreath select ANY color yarn you would like & start wrapping! every 10 or so wraps hot gun it in the back to secure it. Make sure you are wrapping it TIGHT! If you think you are wrapping tight....Pull TIGHTER! seriously, I thought I was wrapping tight and it started looking horrible and I realized I wasn't pulling it as tight as I needed to. Really thought, it's that simple....wrap tight and hot glue every so often.
[Sorry I have no pictures for that but surely you get the point right? hope so]

Now for the felt flower tutorial....
you didn't think I would keep that from you did you??
NO way I heart you too much not to share!

Here we Gooooooo......


You need 3 different sized circles
My orange circles to the right are the card stock I used to cut the felt. How did I make my orange circles? I found 3 things that were circular shaped that I could trace. Just be sure that all three sizes to together well.
Cut out 3 small circles, 5 medium circles & 5 large circles

Large needle & crochet thread [both leftovers from the Fall wreath]

Take one large circle and a little bit into the circle stitch
Up down Up down
[seriously it's that easy & I really do say it out loud! HAH]

Here is a bad up close but ya get the point
Up down Up down
This is creating the pedal shape


Repeat for all 5 big circles
Once you have done all five, pull the thread and create your flower shape

Now that your first layer of pedals is in shape it's time to add the 2nd row which is the medium circles
You will do the same thing as far as Up down Up down does BUT, did you hear that? BUT stitch THROUGH the first big pedal & then insert your medium pedal. So that the big pedal & medium pedal are cupped into each other. This makes for a more stable flower.

See?
Same Up down Up down But INSIDE the larger pedal and sewed to it!

Now I kinda forgot to take a picture of the last row, which is the smallest pedal but it is the SAME
Up down Up down as before ONLY this time you do it just like you did the first row. So they ARE NOT ATTACHED to the others. Remember there are only three, so you want to be able to arrange them without them being stabilized to the other rows.
Then just sew a super cute button onto the middle.
Make sure you end with your thread on the bottom to you can tie it off & cut.

That's it!
Easy huh?

Cute HUH?
[bad pic I know, I know]


I did the same for the white flower just used different sized circles.
To be completely honest I didn't realize how big the gray one was gonna be....um, GIGANTIC! hah I still love it though.

Use this felt flower tutorial for all kinds of projects... If you made smaller ones they would be SUPER CUTE on a headband, or hair clippy or pin...possibilities are ENDLESS my friend!

Happy Crafting!